For those who are hosting or planning to host multiple websites using WordPress CMS, remembering all the logins or managing multiple websites all at once can be a hassle. But the good thing is that there is a WordPress multisite feature embedded in this CMS. Which allows you to manage all your websites from a single WP dashboard & network.
Moreover, you can also assign separate domain names to each site for wp multisite set up within your network. And that’s the whole point of writing this article to inform beginners about “How to install WordPress multisite?” and assign a separate domain to each site in your network.
So, In this brief tutorial, I’ll help you install WordPress Multisite and will also show you the way to give each site in the network its own separate top-level domain. Furthermore, in this wp beginner guide, you’ll also find the correct resource material for how to Install WordPress.
But before you begin your WordPress multisite setup, you need to know the prerequisites for it. So, let’s discuss that briefly.
Requirements to Activate WordPress Multisite
For a multi-website WordPress setup, you need to perform the following tasks:
- Backup your website to avoid any issues.
- Get a good enough server to host your WordPress multisite setup. You can use shared hosting for this job, but only if the traffic on your website is low. But if your traffic is high, or you are expecting higher traffic in the future. Then I recommend using dedicated/VPS hosting because the drawback of WordPress multisite setup is that it utilizes the same resources for all of them.
- You need FTP/File manager access for making changes in the wp-config.php file.
- And before you start the process of WordPress multisite, remember to deactivate all the plugins, so they won’t end up breaking.
How to Install WordPress Multisite
There are two ways to Install WordPress Multisite on your site. The easiest way is through the cPanel. So, open your cPanel, scroll down to Softaculous Apps installer & click on WordPress to Install it.
Note: Not every hosting provider offers this app installer.
Tick the WordPress multisite install option during installation configuration & you’re all done. You have activated WordPress multisite. To learn more about this process, check out our related article on Installing WordPress.
Manual Activation
Now to activate WordPress Multisite manually, you need to edit the wp-config.php. Which can be found in the root folder of your WordPress site Installation. All you need is FTP and login information for your server. For your convenience, here is a video for reference:
After getting access, edit the wp-config.php with your desired editor, I recommend Notepad++. And add this line at the end of that file & save the file to activate your WordPress Multisite setup:
define( 'WP_ALLOW_MULTISITE', true );
But do remember to add it before this line: "/* That's all, stop editing! Happy publishing. */"
How to use multisite WordPress?
Now that you’ve activated WordPress Multisite, it’s time to add network settings. Now open up the WordPress dashboard & click on tools.
Here you’ll see a new option called network setup, click on it & start adding the required information.
When asked if you want to use subdomains or subdirectories choose subdomains.
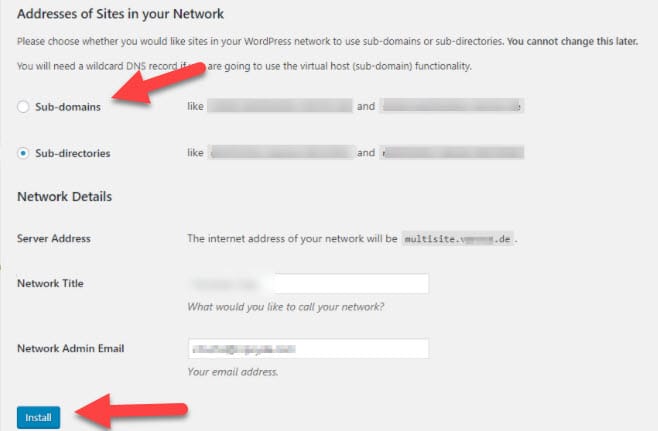
After adding all the info, click on Install, and you’ll be presented with two code snippets. You just need to add these to wp-config.php & .htaccess in the root directory, and you’re all done with WordPress multisite network setup.
Note: Please do not copy-paste the below-listed codes, they are just examples. Copy the provided snippets.
wp-config.php code starts from:
define('MULTISITE', true);
add the whole code before "/* That's all, stop editing! Happy publishing. */"
.htaccess code starts from:
RewriteEngine On
WordPress Multisite: Add new site
After adding network settings, and activating WordPress multisite. Now you’ll be able to add multiple sites to your network & manage everything from one dashboard.
To add new websites, users, or manage other available features. Click on network admin at the top & select your preferred settings
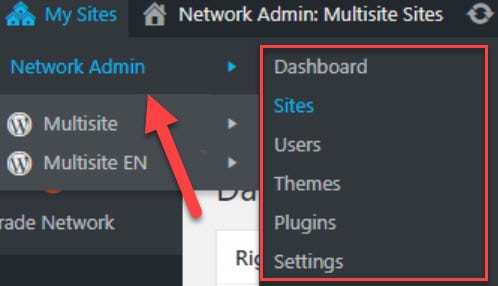
For adding new sites to your network, click on sites. You can activate, deactivate, and manage all your site functions from this panel.
You don’t even need to Install wpmu plugin to manage multiple sites, but you can still give it a try. Moreover, you can also update plugins on all your sites with one click. Now as a super admin you’ll get an option to update plugins on the network after installation. Although, you might need to activate that option from the network settings.
This procedure is for installing multisite on subdomains or directories, but if you want to use the multisite feature with top-level domains follow the below guide.
Install WP Multisite with Top Level Domains
If you installed your primary domain using the www-prefix, a warning will appear when you enable Multisite: We recommend you change your siteurl to example.com before enabling the network feature. Personally I always ignore this warning and have never experienced any problems.
Now to Install WP Multisite with top-level domains, you need to do domain mapping & DNS settings.
Changing the DNS settings
First, we need to point out all the domains we want to use in this network to our WordPress Multisite install. This usually involves two steps:
- Specify the IP address of your server for each domain
- Let your server know it should pass on incoming requests for your domains to your WordPress Multisite install.
In practice, this usually means changing the A-records of your domains and point them to your server.
Pick one domain as your primary domain and add it to the server. For the other ones, you can create virtual hosts under this primary domain.
In DirectAdmin, you would first add a new domain and then go to Admin level > Custom HTTPD Configurations and select your primary domain. You can now add the virtual hosts:
ServerAlias secondarydomain.com www.secondarydomain.com
Map your domains
When WordPress Multisite is up and running you can start adding new sites. By default, they will use a subdomain like subdomain.example.com. To change this to a top-level domain, choose Edit site as Network Admin and specify the domain name you want to use on the info tab.
Also, add one more line to your wp-config.php file: define('COOKIE_DOMAIN', '');
For more details on domain mapping, check out this resource.
To www or not www
If you’re prepending your domains with the www subdomain, you’ll want to redirect the non-www versions of your domain to the www versions. On a single install, WordPress takes care of this, but in a Multisite environment, I’ve always had to do this manually.
For each domain that you’re using, add the below redirect in your .htaccess file (changing example.com to your domain):
RewriteCond %{HTTP_HOST} ^example.com

RewriteRule (.*) http://www.example.com/$1 [R=301,L]
With this, you should now have a Multisite install with separate domain names.
Conclusion:
WordPress has already eased our methods for managing websites, and now you can also manage more than one website with WordPress from a Single Dashboard. So, keeping that in mind, I wrote this brief guide to inform people about how to install WordPress multisite with subdomains/subdirectories & top-level domains. And I hope that you found this source of information helpful. I know that it might sound a bit complicated & you might end up facing issues. So feel free to comment down below, so I can help you out in detail.
Found this information source interesting? Check out our related material
 on WordPress Multisite")
")


")